This is part 4 of The Simple Guide to Photographing Big Mountains.
Part 1: A Simple Guide to Photographing Big Mountains
Part 2: The Right Light
Part 3: Composition Tips
Part 4: Star Images
Part 5: Adding People to the Scene
Stars
Photographing stars can be a great way to get a unique image of the mountains. As digital cameras have improved in low-light shooting, taking images with stars is easier than ever. There are still a lot of challenges to photographing stars (a lack of sleep being at the top of the list). Here are a few tips on how to photograph the celestial bodies.
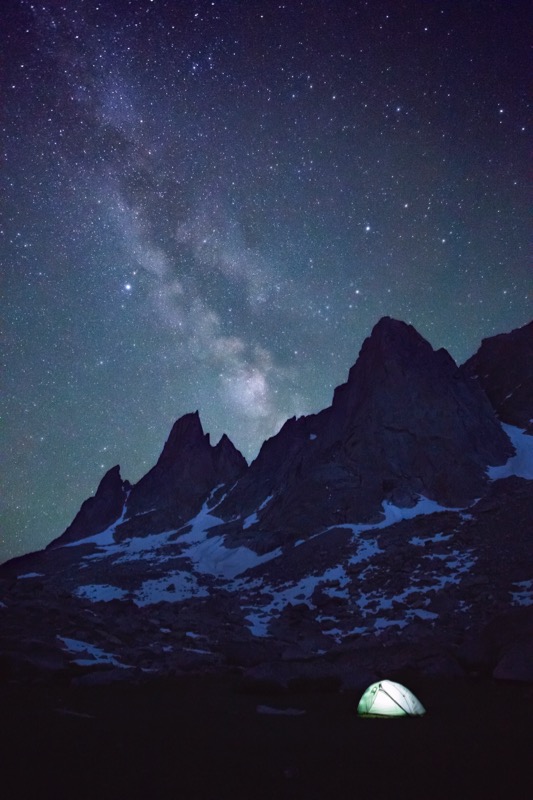
Milky Way Campsite, Wind River Range, Wyoming
Canon 5d Mark III 17-40mm Lens, 30 sec at f/4.0 ISO 4000

Star Trails
There are two basic ways to photograph stars: star trails and star points. Star trails are long exposures in which stars create lines in the sky because of the movement of the earth. In the old days of film, all you needed to capture star trails was to prop open the shutter and come back in a few hours. With digital photography it is a little more complicated. It is not a good idea to open up the shutter for hours at a time because it would build up a huge amount of noise that would render the photo useless. Keeping the shutter open for really long periods of time can also cause the sensor to heat up and damage it permanently. The way around this is to use an intervalometer and take many shorter exposures and combine them later in Photoshop. Some cameras have a built-in intervalometer; others do not and you will need to buy a cable release that has one.
To set up the shot, first focus the lens, either manually or if it is bright enough with autofocus. Then open up the aperture between f/6.3-f/8.0 (I usually don’t open it all the way). Set the ISO to a high number, such as ISO 800, and then choose a shutter speed. I usually set my exposures between 4 and 7 minutes. Finally, set the intervalometer to trip the shutter continuously with a one- or two-second break between exposures. You will end up with a lot of images, with the only difference being the movement in the stars. When you open them in Photoshop, you can stack them into a smart object, and they will be automatically aligned. This will give you the full length of the star trail without any of the adverse effects of leaving your shutter open for hours.
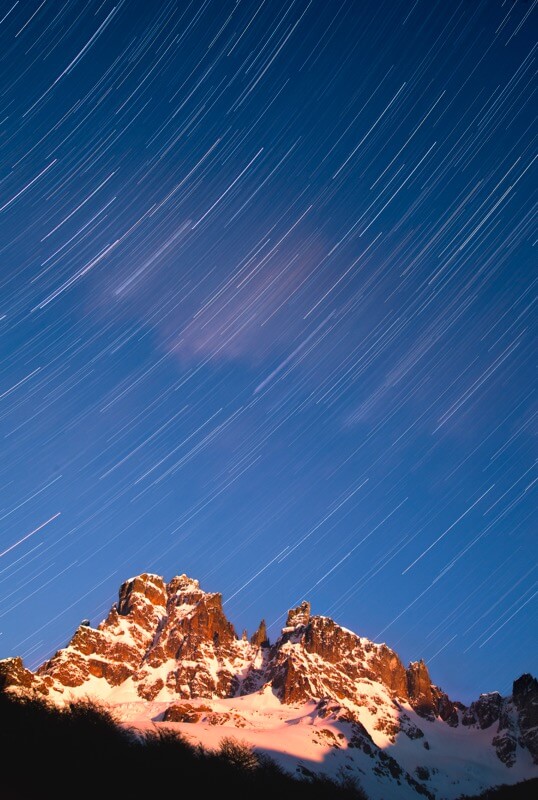
The total time depends on how long you want your star trails to be. In the photo below I made an exposure of roughly forty minutes, but I have also shot star trails for over eight hours. Remember that stars move faster or slower depending on where you are in the world. Also, it will take longer for the stars to “move” across wide-angle lenses than telephoto lenses. The best way to figure out the movement is to do some tests and see how far the trails go in about an hour.
Cerro Castillo, Cerro Castillo National Reserve, Chilean Patagonia
Canon 5d Mark II 24-105mm Lens, 40min (10 4min exposures) at f/7.1 ISO 640

The biggest challenge with shooting stars is figuring out how to light your subject. There are several ways to do this. If the subject is vivid enough, you could just have it be a silhouette. If the subject is small and close enough, artificial lighting is a good option. For mountains, however, the best light source is the moon. This is where careful planning comes into play.
To get a successful moonlit mountain, you need to be there at the right time in the moon cycle. A full moon will light the landscape as if it were daytime, but the excess light in the atmosphere will diminish the amount of stars you can see. A moon too dim will give you a good amount of stars, but you will struggle to get enough light to bring out the detail in the mountains. Somewhere in between a full moon and a dim moon is usually a good bet, but then you need to worry about when the moon rises or sets. These times can easily be found online or with an app such as The Photographer’s Ephemeris. It is important to keep in mind that the moon interacts with the landscape in nearly the same way as the sun. That means that if the light of a sunrise hits a mountain beautifully, it will also receive great light from a moonrise.
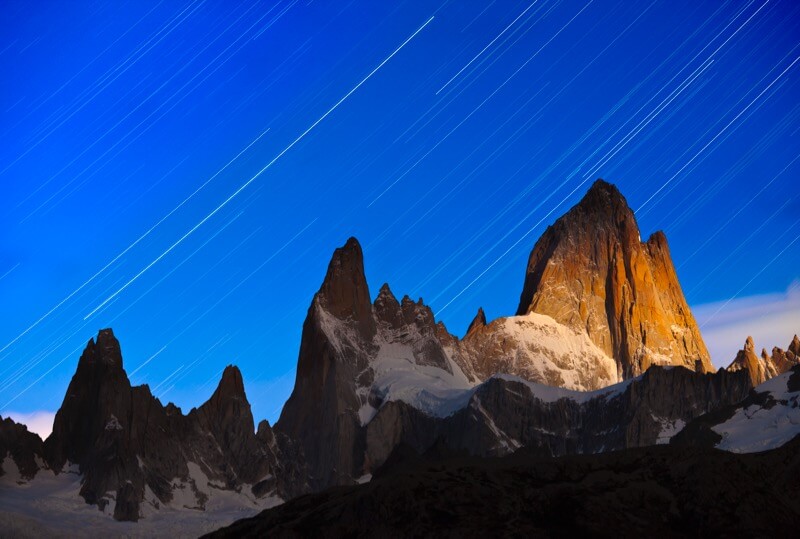
For this shot of Mount Fitzroy in Argentina, I knew that the 2/3 full moon would rise in the middle of the night. I set up the shot an hour before and started recording the stars in the dark sky. As the moon rose, I was able to capture this beam of light on the headwall of Fitzroy with star trails above the peak.
Fitzroy Star Trails, Los Glaciers National Park, Argentinian Patagonia
Canon 5d Mark II 70-200mm Lens, 60 min (15 4min exposures) at f/5.6 ISO 400

Star Points
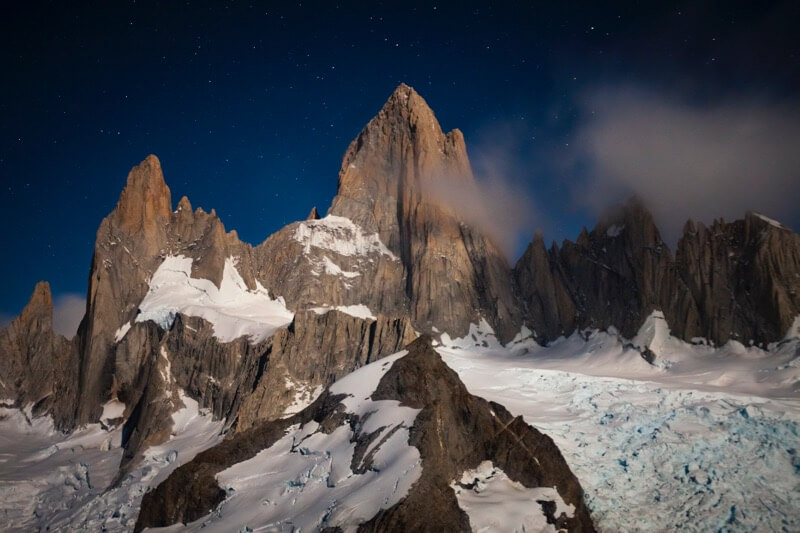
Photographing star points are a little easier than photographing star trails. To photograph star points, the most important thing is getting enough light so that your shutter speed can be short enough to prevent movement in the stars. (In North America, about 15 to 20 seconds is the maximum time you can expose before the stars start streaking. In places like Patagonia or Alaska, that time is closer to 10 seconds.) So for star points I work off of the shutter speed. I set it to 15 seconds and then open the aperture and set the ISO accordingly. If I can, I try to avoid too high of an ISO value because it can make the image grainy and noisy. As I discussed above, in the mountains the best light source is the moon. In this shot of Fitzroy, I waited until the moon would be bright enough to light the mountain and give me a short enough exposure to get crisp star points.
Stars over Fitzroy, Los Glacier National Park, Argentinian Patagonia
Canon 5d Mark II 17-40mm Lens, 11 sec at f/4.0 ISO 1600

Check out part 5: Adding People to the Scene
Follow Grant Ordelheide on Instagram.

